
How to go live with Squarespace
Connecting a domain to your Squarespace site
If you purchased a domain from a third-party provider (like GoDaddy, Google, or 1&1) and want to keep it registered with them, you can connect it to your site by following a process called domain mapping. After completing these steps, your domain remains registered with the host that you purchased the domain from, but it connects to your Squarespace site. Before you begin, review our requirements for connecting a third-party domain.
If you don't have a custom domain, you can register a new one through Squarespace.
Watch a video
Before you begin
Preparation
To follow this guide, you should already have registered a domain with a third-party provider. After you connect your domain by following the steps in this guide, you must leave it registered with your provider to keep it connected to your Squarespace site.
Your domain provider must offer full DNS access. If they don't, you’ll need to transfer the domain to a new provider before connecting it to Squarespace.
We recommend using your domain provider's default nameservers and updating the DNS settings in your domain account.
Most domains connect to a site in 24 hours, but it can sometimes take up to 72 hours. Keep this timing in mind if you have a deadline.
If you get started and decide you want more hands-on help, you can hire a vetted Squarespace Expert.
Features
You can connect your domain to a trial or paid Squarespace site. You can't connect to an expired site.
If you have an email account linked to your custom domain, you can keep using it after connecting to Squarespace. Before connecting your domain, review the recommendations and options.
You can use multiple custom domains for your site, and there's no limit to how many you can connect or register. To learn more, visit Managing multiple domains.
Limitations
It's not possible to connect a third-party domain to a specific page on your site. All connected domains point to the homepage and resolve to the primary domain.
You can't connect a third-party domain to a parking page.
You can't connect a custom domain to Squarespace if the domain name has the word "squarespace" or "sqsp" in it.
Domains with special characters (such as ü, é, ñ) may not display properly on all browsers. If a browser can’t display the character, it reformats the domain with extra characters and dashes. For example, the domain “übercool.de,” redirects to "xn--bercool-m2a.de” in unsupported browsers.
Provider-specific guides
Instead of following the general instructions on this page, we have step-by-step guides for many popular providers:
Step 1 - Start the connection in Squarespace
To connect your domain, start in the Domains panel:
In the Home menu, click Settings, then click Domains. Or, if there's a ☰ in the top-left corner, open that menu and click Domains.
Click Use a Domain I Own.
Enter the full domain name you’re connecting in the Enter Domain field, then click the arrow.
Click Connect Domain.
Select your domain provider from the drop-down menu. If you don’t find your domain provider, select Other. You can still connect your domain if your provider isn't in the list.
Click Connect Domain.
In the message that appears, click Continue.
Step 2 - View your DNS settings
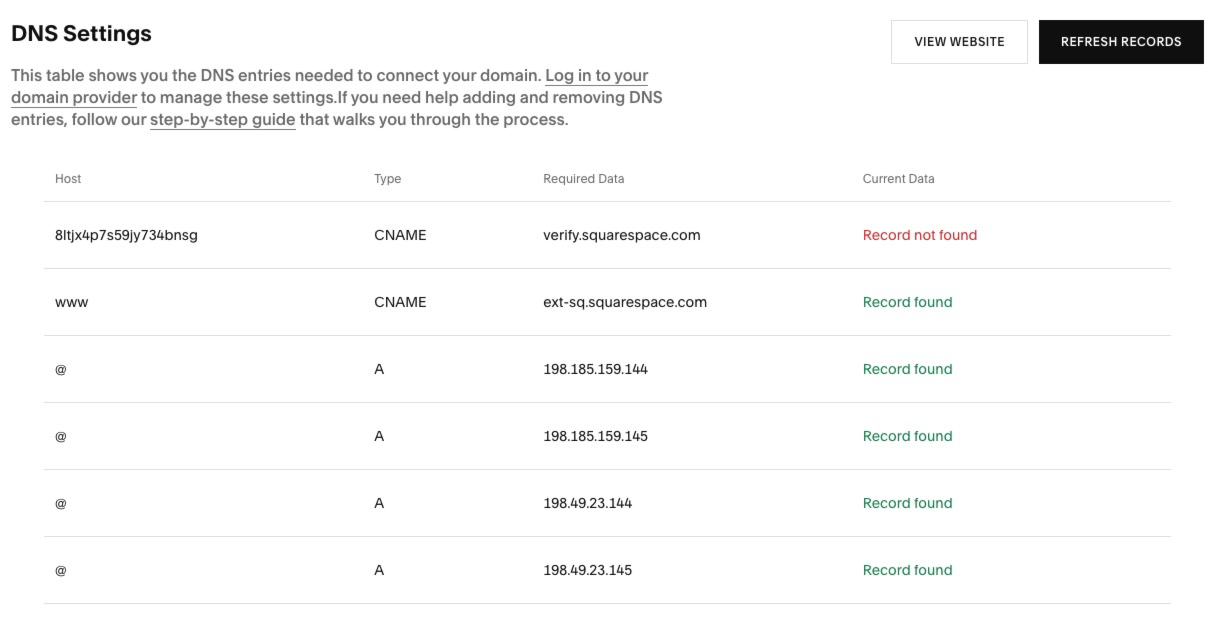
After you click connect, the DNS Settings panel will appear. This panel shows the records you need to enter in your provider's account to connect your domain to your Squarespace site. Keep this panel open for your reference.
Your domain records may be green or red, depending on the DNS information our system receives from your domain provider.
Step 3 - Log into your domain account
In a new browser tab or window, log into your domain account, then find where to manage your domain's DNS settings. Depending on your provider, the settings for managing your domain's DNS records may be called DNS, Advanced DNS Records, Manage Domains, or something similar.
After finding the settings, you may see that you already have DNS records in place. Some providers may require you to change or delete them so your domain correctly links to your Squarespace site.
After finding where to manage your DNS settings, you'll create these records.
Step 4 - Add the first CNAME Record
In the first line of your Squarespace DNS Settings, copy the unique code that appears directly below the Host column. The unique code is a random string of numbers and letters that must point to verify.squarespace.com.
In your provider's DNS manager, create a CNAME with these values:

If you can't add this CNAME due to your provider's settings, you can add a TXT record instead.
Step 5 - Add the second CNAME Record
In the second line of your Squarespace DNS Settings, www appears directly below the Host column. This record must point to ext-cust.squarespace.com.
Depending on your provider, you may already have a CNAME set up with a www Alias. If so, edit this existing CNAME so that Points To is ext-cust.squarespace.com. (For most providers, add this without the last ".")
In your provider's DNS manager, create a CNAME with these values:

Step 6 - Add the A records
In the last four lines of your Squarespace DNS Settings, you'll see four IP addresses in the Required Data column. Each of these displays @ in the Host column.
Depending on your provider, you may already have some A records in place. If so, edit any existing A records with Host Name @ so that Points To matches the values below.
Find the area of your DNS settings where you edit your A records. If possible, create four A records matching what's shown below. If you can only add one A record, use the record in the first row.

If your provider doesn't accept @ as a Host Name, we recommend leaving the Host/Host Name field blank or entering your domain name without the "www" in front.
Step 7 - Wait for the connection to complete
It can take 24 to 72 hours for the connection to start working properly. While you wait you can review the connection's progress, and domain settings in the Domain overview panel.
To find your Domain overview panel, in the Home menu click Settings, click Domains, then click your domain. Or, if there's a ☰ in the top-left corner, open that menu and click Domains.
There you can:
Review the connection's progress - In the Connection in progress section, click View DNS settings, then click Refresh records in the top-right corner. The Current Data column displays if your records are entered correctly. When the domain is correctly linked, it will show a "connected" label in the Domains panel.
Watch for your SSL certificate to generate - In the Details section, review the SSL certificate status. If you visit the domain while it's connecting, you may find error messages about privacy. After the connection completes, your domain generates the SSL certificate and any error messages should disappear.
Monitor error messages - It’s normal for your domain to show errors for up to 72 hours after completing the steps in this guide. If the error messages persist after 72 hours have passed, troubleshoot the connection in the next section.
Troubleshoot with the DNS record checker
If we detect that your records weren’t set up properly, your domain appears in the Domains panel with the message DNS Error. To troubleshoot, use the DNS checker tool in the DNS Settings panel to determine the exact CNAME and A records to fix with your domain provider.